
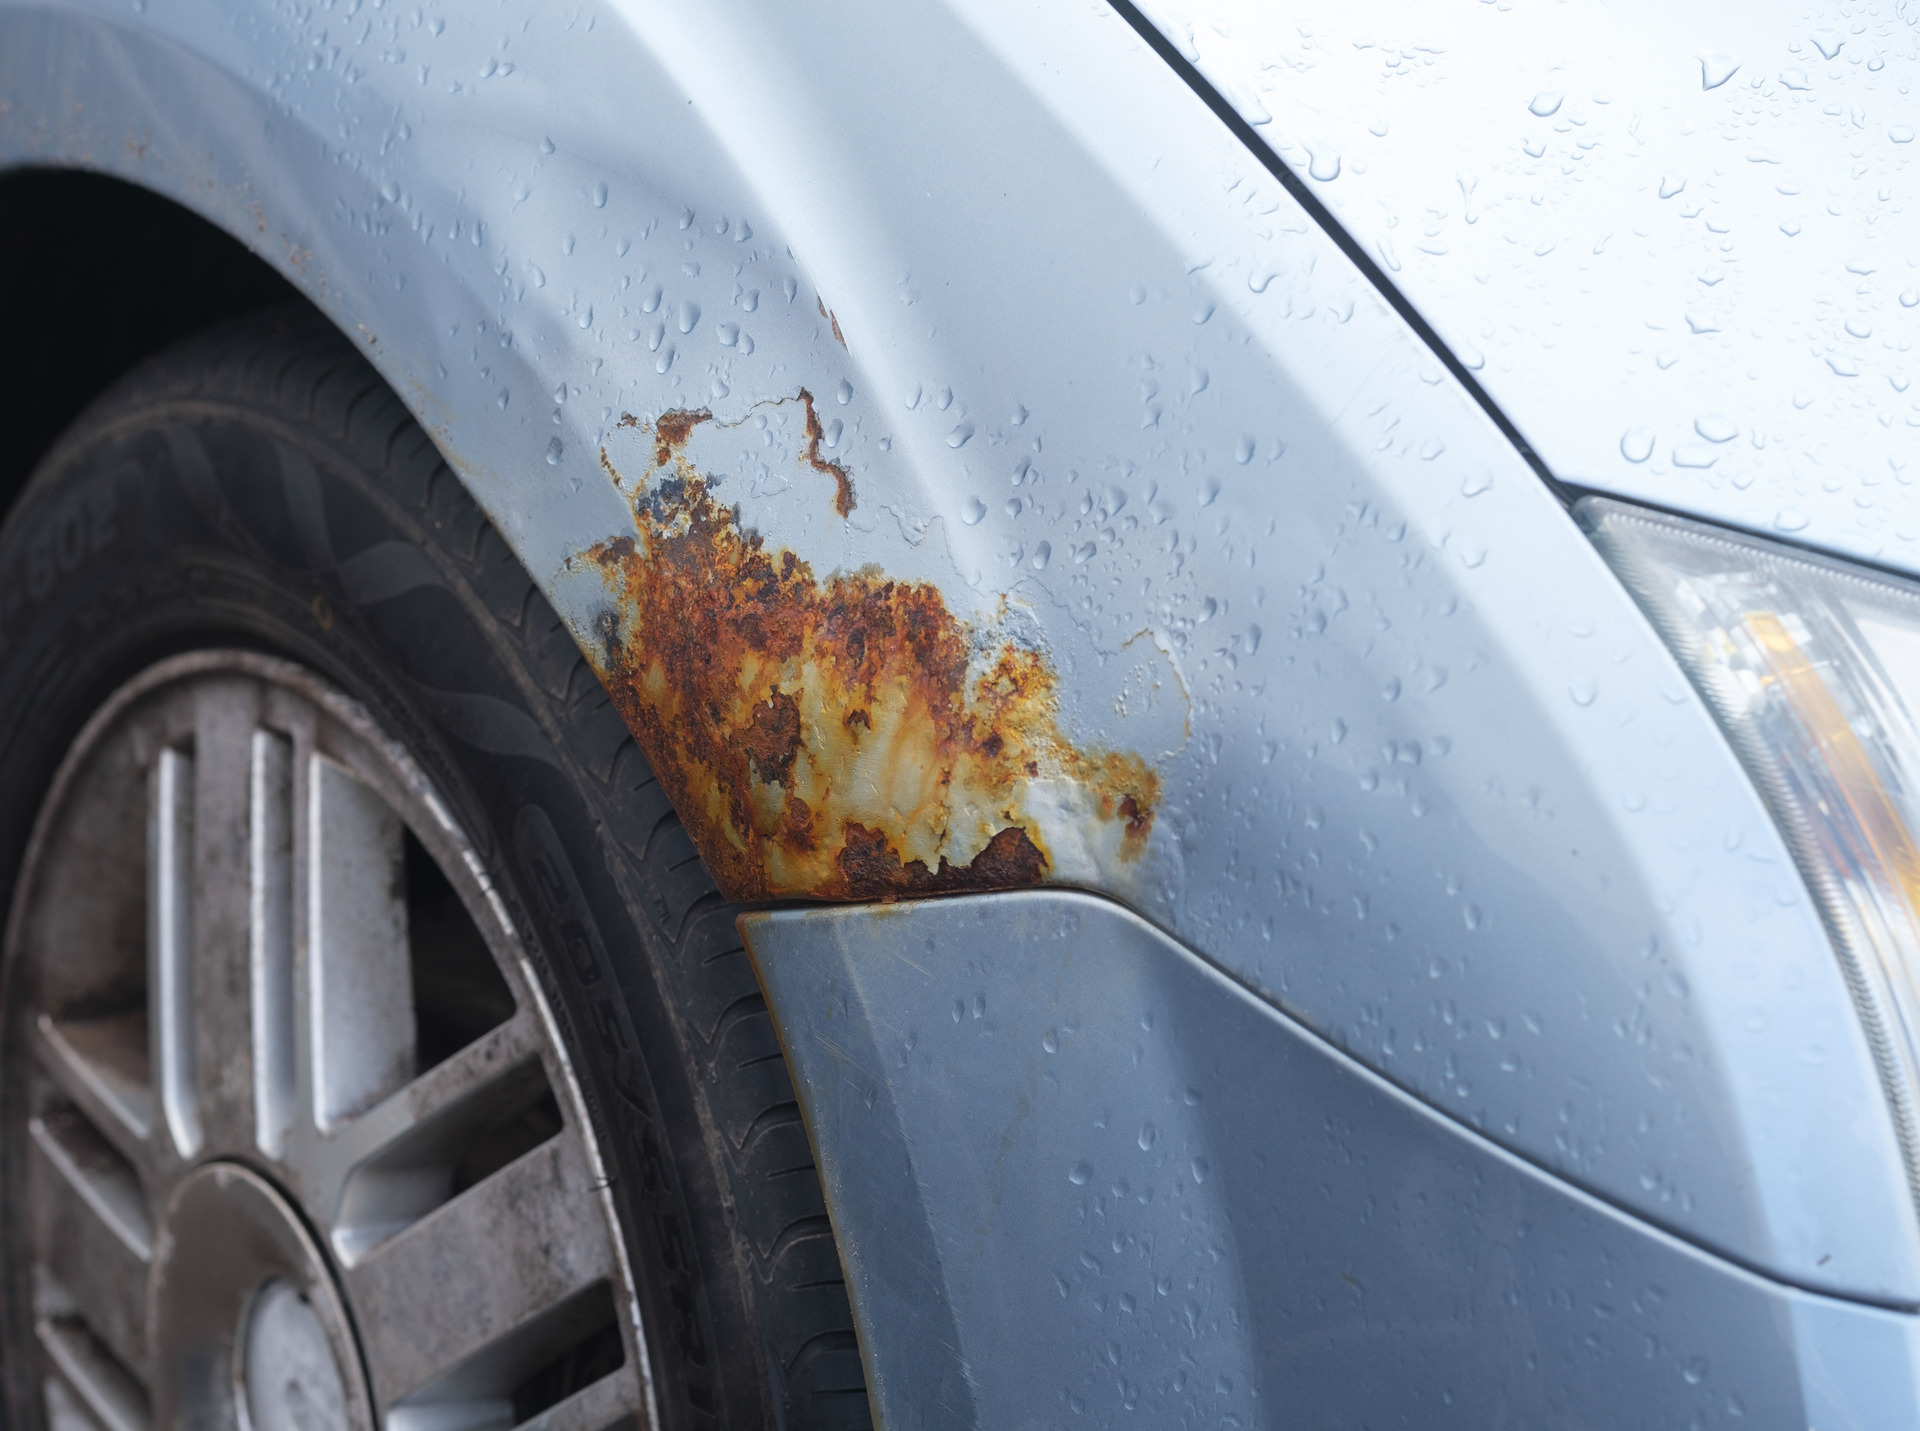
If you’ve noticed your car’s once-glossy paint job losing its shine and starting to look dull or chalky, you’re likely dealing with oxidation. This natural process, caused by exposure to sunlight, road salt, and environmental contaminants, can leave your vehicle looking older than it really is. The good news? With the right tools and a little elbow grease, you can restore that paint back to its former glory. In this step-by-step guide, we’ll walk you through how to fix car oxidation and bring your vehicle’s appearance back to life. Whether you drive a rugged Sierra 1500 or a sleek Envision, our tips will help you tackle the problem and get your car looking as good as new. Ready to roll up your sleeves? And if you prefer to leave it to the professionals, feel free to visit or contact Phillips Buick GMC—we’re here to help with all your car care needs in Orlando, Claremont, Winter Garden, and Groveland.
Step 1: Wash Your Car Thoroughly
Before diving into fixing car oxidation, the first step in restoring your vehicle’s paint is a clean surface. Washing your car removes dirt, debris, and contaminants that could interfere with the oxidation repair process. Whether you drive an Acadia, Enclave, or Sierra 1500, a good wash is crucial for making the next steps more effective.
Here’s how you can wash your car thoroughly to start the restoration process:
Gather the Right Supplies
- Car shampoo or cleaning solution
- A bucket of water
- Sponge or wash mitt
- Microfiber cloth
Rinse First
Begin by rinsing your vehicle to remove loose dirt and debris. This simple step helps to prevent scratching the paint when you scrub.
Wash from Top to Bottom
Start washing from the top of the car and work your way down. This method ensures that dirt and grime from the higher parts of the car fall to the lower parts, where they’re less likely to cause damage.
Use a Soft Sponge or Wash Mitt
Avoid using a rough cloth or harsh material. A soft sponge or wash mitt is ideal for cleaning without causing scratches.
Don’t Forget the Wheels
Your wheels collect a lot of dirt and grime. Give them a thorough scrub, as contaminants here can also contribute to oxidation.
Rinse Again
After washing, rinse your car thoroughly. Be sure to remove all soap residue to prevent water spots from forming.
Dry with a Microfiber Cloth
Dry your car using a microfiber cloth to prevent water spots. Gently blot or wipe the surface, avoiding any harsh rubbing that could scratch the paint.
A clean car is the best way to begin the process of removing oxidation step by step. By ensuring your vehicle is free of dirt and contaminants, you’re setting the stage for successful restoration. Once your vehicle is clean, you’ll be ready to move on to the next phase of oxidation repair.
Step 2: Use a Clay Bar to Remove Contaminants
After washing your car thoroughly, the next step in fixing oxidation is to remove any remaining contaminants from the paint. This is where a clay bar comes in. Using a clay bar is essential to ensure a smooth surface before applying any polishing or rubbing compounds.
Here’s how to use a clay bar effectively:
Gather Your Materials
- Clay bar
- Clay bar lubricant (or soapy water)
- Microfiber towels
Prepare the Surface
Before you begin, ensure the car’s surface is wet. You can either use a specific clay bar lubricant or mix some soapy water. This will help the clay bar glide smoothly over the paint.
Break Off a Small Piece of Clay
Take a small portion of the clay bar and knead it into a flat shape. This will make it easier to work with and reach all areas of the car.
Start Claying the Vehicle
Gently rub the clay bar back and forth across the car’s surface. Work in small sections, using light pressure. Focus on areas where the paint feels rough or uneven, as these areas may have contaminants or oxidation buildup.
Keep the Surface Wet
As you move the clay bar over the paint, reapply lubricant as needed. This keeps the surface smooth and prevents any scratching.
Check the Clay Bar
After a few passes, check the clay bar. If it becomes dirty or picks up contaminants, fold it over to reveal a clean section. This helps ensure you’re not rubbing dirt back into the paint.
Wipe Down with a Microfiber Cloth
After each section, use a microfiber cloth to wipe away any residue and check the smoothness of the surface.
Using a clay bar helps to restore car paint oxidation by removing embedded contaminants that could prevent the next stages of oxidation repair. Once the surface is free of dirt and grime, you’ll be ready to proceed with polishing and restoring the shine to your vehicle. Whether you drive an Enclave, Envision, or Sierra 1500, taking the time to clay your vehicle ensures that you’re removing oxidation step by step in the most effective way.
Step 3: Apply a Polishing Compound
Now that you’ve removed contaminants from your car’s paint, the next step is to apply a polishing compound. This is one of the most effective ways to restore car paint oxidation and get your vehicle looking shiny and new again. The polishing compound works by buffing out the oxidized layers of paint, revealing a smooth, glossy finish.
Here’s how to apply a polishing compound:
Choose the Right Polishing Compound
There are many types of polishing compounds. Select one that matches the level of oxidation you’re dealing with. Light oxidation may need a mild compound, while heavier oxidation may require a more aggressive one.
Gather Your Tools
- Polishing compound
- Applicator pad or polishing machine
- Microfiber towels
Apply the Compound
Start by applying a small amount of polishing compound to the applicator pad. If using a machine, apply a few drops of compound directly to the pad. You don’t need much—just enough to cover the section you’re working on.
Work in Small Sections
Begin with a small, manageable area. Work the compound into the paint using a circular or back-and-forth motion. If you’re using a machine, set it to a low speed to avoid damage. If you’re applying by hand, use even pressure to work the compound in.
Buff the Area
After a few minutes of working the compound into the paint, use a microfiber towel to wipe off the excess. You should start to see a noticeable difference in the paint’s appearance.
Inspect Your Work
Once you’ve polished an area, step back and inspect it. You should notice a smoother, shinier surface. If any oxidation is still visible, apply a second layer of compound and repeat the process.
Move to the Next Section
Continue working in small sections around your vehicle, making sure each area is polished to your satisfaction.
Applying a polishing compound is a crucial step in fixing car oxidation. It helps remove the cloudy, dull appearance caused by oxidation and leaves behind a shiny, restored surface. Whether you drive an Acadia, Enclave, or Sierra 1500, this step will help bring out the best in your vehicle’s paint. By following this process, you are removing oxidation step by step and restoring your car’s beautiful finish.
Step 4: Consider Using a Rubbing Compound for Heavy Oxidation
If your car still shows signs of heavy oxidation after using a polishing compound, it’s time to consider a rubbing compound. A rubbing compound is stronger and more abrasive than a polishing compound, making it ideal for removing stubborn oxidation. This step is especially helpful when restoring car paint oxidation that just won’t come out with regular polishing.
Here’s how to use a rubbing compound:
Choose the Right Rubbing Compound
Rubbing compounds come in different levels of abrasiveness. For heavy oxidation, you’ll need a more aggressive formula. However, be careful not to overdo it, as too much abrasion can damage your paint.
Gather Your Tools
- Rubbing compound
- Applicator pad or polishing machine
- Microfiber towels
Apply the Rubbing Compound
Just like with the polishing compound, apply a small amount of rubbing compound to your applicator pad or directly to the polishing machine. A little goes a long way, so start with a small drop.
Work in Small Sections
Focus on one area at a time. Rub the compound into the oxidized paint using a circular motion. If you’re using a machine, keep the speed low to prevent paint damage.
Buff the Surface
Once the rubbing compound has been worked into the paint, use a clean microfiber towel to wipe off the excess. You’ll begin to see the oxidation slowly vanish as the surface smooths out.
Inspect the Results
After buffing, examine the area closely. If the oxidation is still visible, you may need to apply more compound and repeat the process. However, most cases of heavy oxidation will be noticeably reduced after a single application.
Move to the Next Section
Continue working in sections, applying the rubbing compound where necessary. Be sure to buff each section thoroughly before moving on.
Using a rubbing compound for oxidation repair is a powerful way to remove stubborn oxidation step by step. Whether you’re working on an Acadia, Enclave, or Sierra 1500, this method will help restore car paint oxidation and bring back the vehicle’s original shine.
Step 5: Wax Your Vehicle to Seal the Paint
After removing oxidation and restoring your car’s paint, it’s time to seal the surface with a high-quality wax. Waxing your vehicle will protect the paint and maintain its restored shine. This step is essential to ensure that your hard work doesn’t go to waste.
Here’s how to properly wax your vehicle:
Choose the Right Wax
Select a wax that suits your car’s paint. There are several types of waxes available, including liquid, paste, and spray options. Liquid waxes are easier to apply, while paste waxes offer long-lasting protection.
Prepare the Surface
Make sure the paint is completely dry before applying wax. If the car surface is still damp, the wax won’t adhere as effectively.
Apply the Wax
Use a soft microfiber cloth or an applicator pad to apply a thin, even layer of wax. Work in small sections, starting from the top of the vehicle and moving down. This helps ensure that no wax is left on areas that are harder to reach.
Let the Wax Dry
Allow the wax to dry to a haze. This typically takes about 5-10 minutes, depending on the temperature. Don’t rush this process, as drying time is important for the wax to bond to the paint.
Buff the Surface
Once the wax has dried, use a clean microfiber towel to buff off the residue. Work in circular motions to remove all excess wax and bring out the shine.
Check for Residue
Inspect your car carefully for any leftover wax. It’s important to remove all residue to avoid spots and streaks.
Repeat as Needed
If necessary, apply a second layer of wax for extra protection. This is particularly helpful for vehicles that experience harsh weather conditions.
Waxing your vehicle helps seal in all your hard work and provides an extra layer of protection against dirt, water, and environmental elements. It also prevents further oxidation from setting in, ensuring that the paint stays looking fresh for a longer period.
For those who drive vehicles like the Acadia, Enclave, or Sierra 1500, regular waxing is an easy way to keep the car’s exterior looking sharp. Waxing is the final step to protect your car’s restored paint and maintain that glossy, new-car look.
Get Your Car’s Rust & Oxidation Fixed Professionally
While DIY methods can help reduce minor paint oxidation, sometimes restoring your vehicle’s shine requires professional care. That’s where the Phillips Buick GMC Collision Center and Body Shop comes in. Conveniently located near Orlando, Clermont, Winter Garden, and Groveland, our certified technicians are equipped to handle everything from surface-level oxidation to more advanced rust and paint damage.
Rust and oxidation don’t just impact your car’s appearance—they can also lead to long-term corrosion that affects your vehicle’s value and performance. Our body shop team uses industry-leading tools and products to safely remove oxidation, repair paint damage, and restore your car’s exterior to its original condition.
Why Trust Phillips Buick GMC?
- ✅ Certified collision repair experts
- ✅ State-of-the-art body shop for paint correction and refinishing
- ✅ Comprehensive rust repair and prevention services
- ✅ OEM-approved materials and technology for lasting results
Whether you’re driving a stylish Buick Envision, a rugged GMC Sierra 1500, or a dependable Acadia, you deserve a vehicle that looks as great as it drives. Let our collision and body shop specialists handle the heavy lifting. We’ll not only fix visible oxidation but also apply protective coatings to help prevent future damage.
Book Your Appointment Today
Don’t let chalky, faded paint bring down your vehicle’s value or curb appeal. Schedule a visit to the Phillips Collision Center or contact our team today to get a custom quote. We’ll inspect your vehicle and recommend the right treatment plan to get your paint looking vibrant again.
Prefer a hands-off approach? Let us handle the oxidation for you while you relax—Phillips Buick GMC is your trusted partner for professional car care in Central Florida.
Which products are recommended for removing oxidation from car paint?
To remove oxidation from car paint, it’s recommended to use a clay bar to remove surface contaminants, followed by a polishing compound to restore the shine. If oxidation is severe, a rubbing compound may be necessary for heavy-duty removal.
Is wet sanding ever necessary for severe oxidation?
Yes, wet sanding may be necessary for severe oxidation. It’s a more aggressive method that involves using fine sandpaper and water to smooth the paint surface before polishing. However, it’s important to proceed carefully and consider professional help if unsure.
How can I maintain the paint finish once oxidation is removed?
To maintain the paint finish after oxidation removal, regularly wash your car with a gentle, pH-balanced car soap, and wax your car every few months. Waxing provides a protective layer that helps shield the paint from environmental damage. Additionally, storing the vehicle in a garage or shaded area can help prevent future oxidation.
Restore Your Vehicle’s Paint & Explore Our Quality Vehicles
If you’re looking to restore your vehicle’s paint and protect it from future oxidation, Phillips Buick GMC is here to help. Whether you’re in Orlando, Claremont, Winter Garden, or Groveland, we invite you to explore our wide selection of vehicles, including the Acadia, Enclave, Envision, and Sierra 1500. Our team is dedicated to providing you with top-notch service and high-quality vehicles.
For more information on maintaining your car, you can explore how to keep your vehicle in optimal shape. Learn more about routine maintenance tasks like tire rotations for the 2025 Buick Envision, Buick Encore GX, and GMC Sierra 1500. We have helpful tips on keeping your vehicle running smoothly over time. Visit our Body Shop Services to find out how we can assist with your vehicle care needs.
Feel free to contact us for any questions or assistance, or stop by Phillips Buick GMC to find your next car and ensure it stays in great condition for years to come.
Get Directions to Phillips Buick GMC
Disclaimer: All information is provided for general informational and entertainment purposes only. While we strive for accuracy, we cannot guarantee that all content is complete, current, or error-free. Any reliance you place on such information is strictly at your own risk. This article may include opinions and is not endorsed by, or officially affiliated with, any vehicle manufacturer or brand. Always consult official sources – such as the vehicle’s owner’s manual, authorized dealerships, or certified professionals – for the most up-to-date and personalized information.
Connect with us


Recent Blog Entries
- 2026 GMC SUV Lineup: Which GMC SUV Is Right for You? Terrain vs. Acadia vs. Yukon
- 2026 Buick Enclave Review — Your Perfect Companion for Life in The Villages, FL
- GMC AT4 vs. Elevation: Which GMC Truck Trim Is Right for You?
- Phillips Transparency Pricing – No Hidden Fees | Price Match Guarantee
- 2026 Buick Enclave Review — 7 Powerful Reasons It’s the Best SUV for The Villages, FL